 JOIN
JOIN MEMBERS
 C-TOW APP
 CAREERS
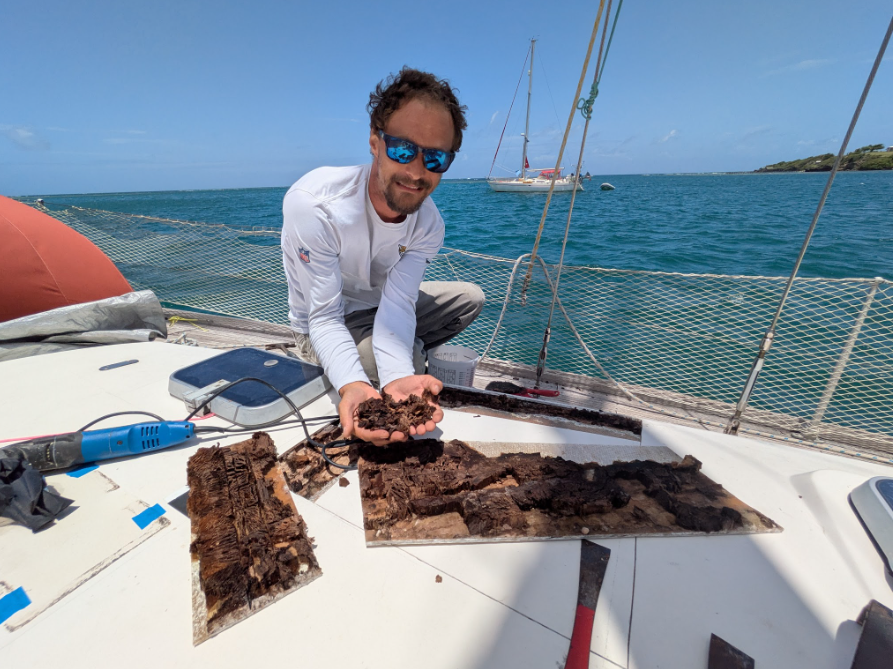
In an old boat like ours, 1983, you are bound to find some rotten core somewhere onboard. Every piece of hardware bolted or screwed into the deck is a point where water can enter and get trapped inside the core. At its worst this leads to a cracked and soft deck. Depending on the top laminate thickness problems may show up quickly as the deck degrades. But on older boats these problems can be more hidden as the laminate is thicker. This means even tapping the deck to find the bad core can give you false hope as it may sound fine but in fact it has a lot of water in it. That is until you try and rebed something and after you pull out the fasteners you realize the core has become a wet sponge. Sometimes it’s staring you right in the face with a section of cracks alongside a deck that sags when you step on it. Now that you have found the issue, how do you fix it? It seems like a daunting and intimidating job and it is easy to find yourself putting it off again and again. Eventually you are going to need to address the issue and when that time comes hopefully this can help you.
First off, avoid the temptation to just pour some kind of epoxy into some drilled holes. That’s like trying to put a bandage on a leg that needs amputation. It won’t fix your problem and is going to give you more work when you eventually have to do it right. Most epoxy won’t cure when wet, and after seeing the massive voids created when the wood core turns to wood soup you are going to need gallons of the stuff. Even the products that are meant to be injected into rotten wet wood are not structural.
Regardless of how big or small the damaged section is, the process to do it right is mostly the same aside from a few options to trade material for time.
Step 1: Mark off the damaged section
Using a mallet or the back of a screwdriver to tap the deck listening for changes in sound. A sharp tap normally means the core is good while a dull thud means problems. This doesn’t need to be perfect since you are likely going to need to cut a bigger section that you think.
Step 2: Cut out the old damaged core.
I like to use a multi tool or skillsaw to cut the top layer of laminate back. With the multi tool you can watch the blade as it cuts through the top layer into the core keeping your eye out for moisture coming out of the cut Wet dust means you can keep cutting in that direction while dry dust means you likely found some good core and you can stop. After you cut a section out you are going to need a variety of metal scrapers and pry bars to peel up the top layer of fiberglass. Depending on how rotten the core is this task may be satisfyingly easy with small force and a pop before it comes out. If the core is only a little wet or dry you may find yourself slowly prying while cringing at the crackling of fiberglass as it comes apart leaving some glass on the core behind. Now that the core is exposed you can see just how bad it really was. The multi tool comes in handy to remove the bad core inside as well.
Our core was mostly ¾ ” balsa with some plywood in some flat sections and since the boat has lasted this long with it we decide to go with the same material while making sure to seal in all fasteners properly by drilling oversized holes and filling all holes with thickened resin before redrilling. This seals the new core completely and should stop the core from getting wet again in the future. Of course you could pay much more for a material that won’t rot but sealing a wood core properly is more cost effective and should last longer than 40 years.
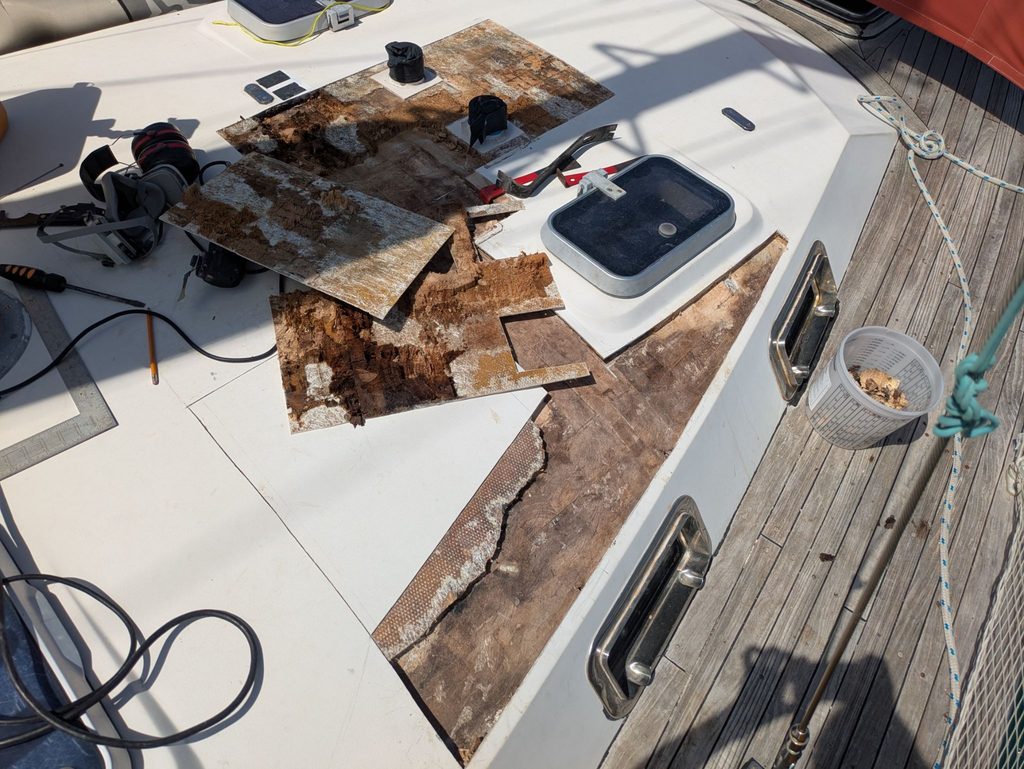
If you find more rotten core outside the area you cut then you are going to have to cut another panel and keep cutting until you find dry core on all sides.
Step 3: Prep for new core.
Now the fun begins. Sanding, sanding and more sanding. Prepping for the new core involves sanding down the top and bottom layers of laminate to remove any leftover coring material and give the new core something to bond to. The more time spent making sure the glass is roughed up and cleaned of dust the better bond and easier time you will have fitting the new core. Make sure to sand down enough as you need the new core to sit flush with where the old core was.
Step 4: Core jigsaw puzzle
Now it’s time to start dry fitting the new core back in. With balsa you are working with little squares that can be cut with a knife to size and fit into place. When you have gotten it all in place take a few pictures of the core as sometimes it’s hard to keep track of what goes where after you have removed it, especially if it’s in many pieces rather than a sheet cut to fit.
Step 5: Put it back together.
At this point you need to decide if you want to save time or money. You can spend more on materials and replace the top laminate with new glass. This is going to save you sanding time and may be a better option for a larger area. Or you could prep the underside of the old top layer and glue it to the new core and apply weight to keep it flush while it cures. Best for smaller areas but it can be tricky to apply enough pressure to get a flush fit. Which leads to more fairing and sanding.
After the area is prepped and cleaned I like to leave the balsa in place and brush on epoxy over everything. Removing sections at a time to fully cover all sides of each square of balsa with epoxy. This keeps the core from blowing away or losing track or what goes where. After everything is saturated I mix some thickened epoxy with silica to make a mayo consistency. Using the thickened epoxy as glue for the core to stick to both sides of the laminate and fill all gaps in the core. Be generous but don’t over do it as you want some to squeeze out but too much makes the laminate sit higher than the rest of the deck. After everything is in place and the top skin glued down you need to get weight on it. My favorite way is using some scrap wood and screwing that down to the dry deck with some wax paper between for easy removal. This keeps even the tricky rounded slopes reasonably flush. After everything is cured just remove the wood and fill the holes up again with thickened epoxy.
Sandbags are an option but harder on a slope.
If you decide to not use the old laminate you simply have to lay new glass over the area after the core is glued down.
Step 6: finishing
Finally the deck is sealed again. If you didn’t use new glass you still need to glass the seams where you cut. This means tapering all cuts with a grinder and laying strips of glass between. For these top layers I switch to polyester so that I can use gelcoat for the final finishing. After the glass is cured, sanded and cleaned, fair everything in with glass bubbles and polyester. At this point you are almost done and your deck should have almost its original shape back. It’s time for gel coat matching and noneskid. This is a tricky, time consuming part and could use its own article altogether. But take your time and add only the tiniest spec of pigment at a time. A toothpick drop is often too much for a couple ounces of gel coat.
Finally, you have a much stronger deck and hopefully after all that work your boat buddies won’t even be able to tell you did anything at all. It’s both rewarding and disheartening at the same time. You did great since nobody can tell you have done work and yet all your hard work is hiding making you feel like you accomplished nothing. Only you get to know just how solid your boat is now and how much better it is than when it came out of the factory.
Cory Bertrand
Cory and Alex share their adventure with weekly videos on their YouTube channel “Wildly Intrepid Sailing”. Their dream is to travel the world and to live without any regrets.